You do not need an account for the standard Instant export. The editor opens on the Route tab; once you have a valid route, Preview and Export become available.
Think of the workflow as four blocks: build the itinerary, choose how each leg travels (and optionally a YouTube camera preset), tidy visuals in Vehicle / Style / Settings, then record Instant WEBM or MP4. Cloud export may appear in the UI but is temporarily disabled—always use Instant for downloads today.
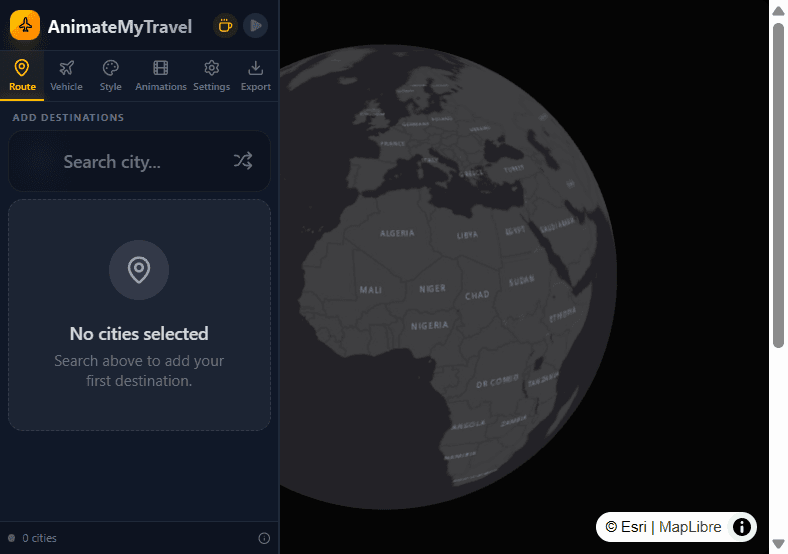
Route tab with city search in the AnimateMyTravel editor
每个控件的作用
Open Create and add cities
Go to Create. Use Search city… to add each stop, or Add Random City to try the tool quickly. Drag items in the itinerary list to reorder. Cities are not added by clicking the globe—the map is a preview, not a place picker.
Set travel mode (and optional preset)
With two or more cities, each leg shows Fly, Drive, Walk, or Cycle. That choice drives routing and the default vehicle when Vehicle is on Auto. Above the itinerary you can also pick a YouTube preset (Travel, Spin, Stops, Distant) or leave Manual.
Tune Vehicle, Style, Animations, Settings
Optional but useful: pick Airplane/Car/Person or keep Auto, change globe/map style, choose a Manual camera style if no YouTube preset is active, and adjust duration, markers, and trail. Defaults already produce a watchable clip.
Export Instant video
Open Export → Instant. Choose WEBM (faster) or MP4 (more compatible), then 60 / 120 / 240 FPS. Record & Download writes a 1920×1080 file in the browser. You need 2+ cities for most flows; Spin works with a single city.
面板 02 · Destinations
Route & destinations
The Route tab is where every animation starts. If the search box is empty and no cities appear, nothing else in Create can preview or export.
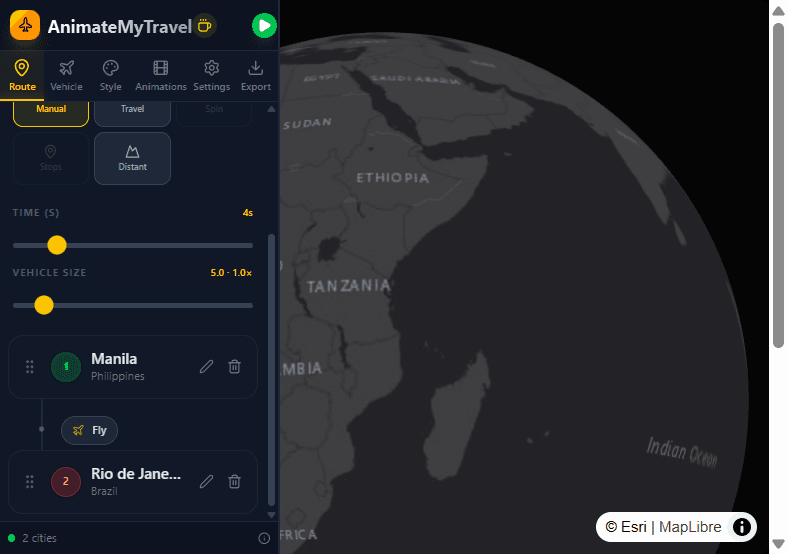
Add destinations only through search (or Add Random City). When you have two or more cities, the itinerary lists each stop with edit/remove actions and a travel-mode control on the connector between cities. Reordering is drag-and-drop. Ground modes (Drive / Walk / Cycle) use road-style routing when available; Fly uses great-circle style paths suited to airplanes.
Itinerary list with per-leg travel modes Fly, Drive, Walk, and Cycle
每个控件的作用
Search a city
Type a city or place name into Search city… and choose a result from the list. Add Random City inserts a curated well-known city if you want to explore without typing. Keep adding until the footer shows at least two cities (unless you plan to use Spin with one).
Travel modes per leg
Between stop A and stop B, pick Fly, Drive, Walk, or Cycle. Changing the mode updates how the path is built and what Auto vehicle will show. You can mix modes on a multi-city trip (for example Fly then Drive).
Reorder, edit, remove
Drag cities to change visit order. Use Edit to replace a city via search, or Remove to drop a stop. After changes, wait for route preprocessing before Preview if the path is still updating.
面板 03 · Vehicles
Vehicle panel
The Vehicle tab controls what travels along the route and how large it appears on the globe.
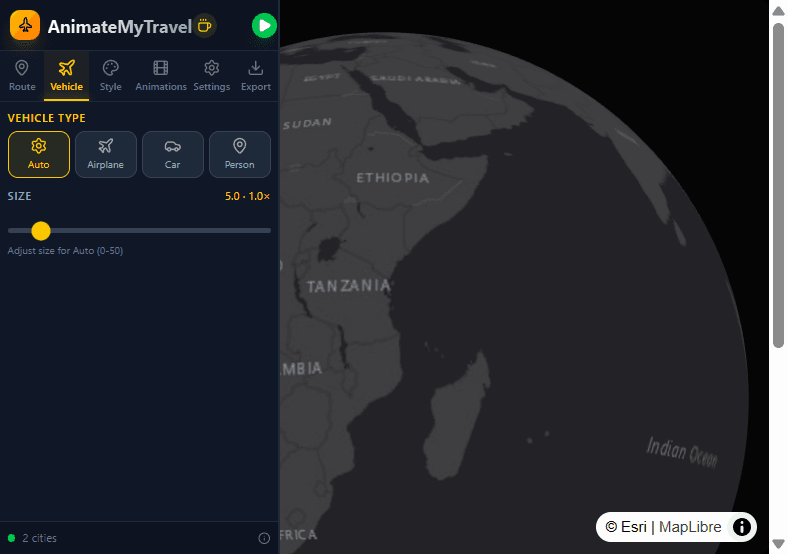
Auto is the default: it maps Fly→plane, Drive→car, Cycle→bike visuals, Walk→person. Choosing Airplane, Car, or Person manually also forces the matching travel mode on legs. Size is a continuous slider (roughly 0–50) so long-haul shots can use a smaller plane and close city hops a larger one.
Vehicle tab showing Auto, Airplane, Car, and Person
每个控件的作用
Auto
Best starting point. The vehicle switches with each leg’s travel mode so a multi-mode itinerary stays consistent without opening this tab again.
Airplane
Locks the vehicle to a plane and forces flying legs. Use for classic A→B flight intros even if you previously set Drive.
Car
Locks to a car and driving legs. Prefer shorter mainland hops where road routing looks believable.
Person
Locks to a walking figure and walking legs. Best for short urban segments; long country hops usually look odd.
Size
Drag Size to scale the model in the preview. The Route tab also exposes Vehicle size for faster tweaks without leaving the itinerary.
面板 04 · YouTube presets
YouTube animation presets
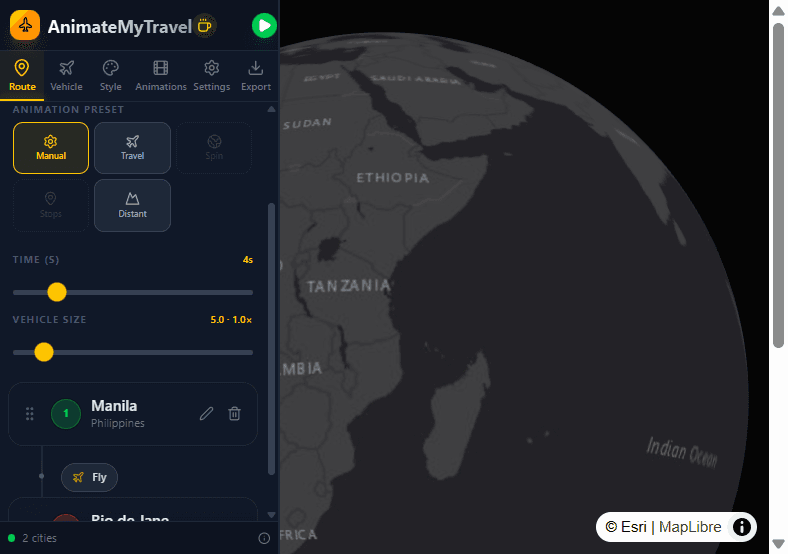
YouTube presets live on the Route tab above the itinerary. Each one packages camera motion, trail, and landings for a common travel-video look.
Presets have hard city-count (and sometimes distance/mode) rules. Buttons that are disabled do not match your current route. Activating a preset often sets duration to 3 seconds by default. Manual clears the YouTube preset so Animations → Camera Style is free to change. Legacy preset IDs from older share links still map into these four active options.
YouTube animation preset selector on the Route tab
每个控件的作用
YouTube Travel
Requires exactly two cities. Follows the vehicle with a cinematic side track and approaches the destination near the end—the classic A→B flight or road open.
Globe Spin Arrival
Requires exactly one city. Spins the globe then arrives on that place. There is no route trail because there is only a destination highlight.
Country Stops
Requires three or more cities. Emphasizes waypoint countries with a wider drone-style framing and landings along the multi-leg path.
Distant
Requires two cities, flying only, and a long-haul distance (about 1500 km or more). Far follow of the plane with a wide pullback ending—ideal for intercontinental hops.
Manual
Turns the YouTube preset off. Use this when you want Side Vlog, Drone Wide, Orbit, Overview, or Story Zoom from the Animations tab instead.
面板 05 · Camera styles
Manual camera styles
Manual camera styles only appear (and apply) when no YouTube preset is active.
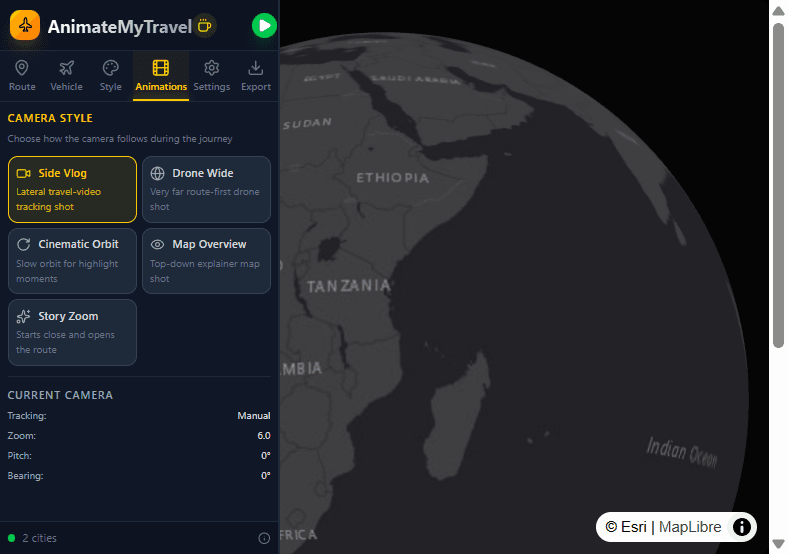
Open Animations and choose Camera Style. These profiles change how the viewpoint tracks the vehicle or route: side follow, distant drone, orbit, top-down overview, or a zoom that opens the path. Current Camera in the same tab shows live tracking, zoom, pitch, and bearing while you preview.
Animations tab with Manual camera styles
每个控件的作用
Side Vlog
Lateral travel-video tracking shot—feels like a camera flying beside the vehicle along the path.
Drone Wide
Very far framing that keeps the whole route readable first, then follows with a wider context.
Cinematic Orbit
Slow orbit useful for highlight or arrival moments when you want the destination to feel presented.
Map Overview
Top-down explainer style—good when the story is the shape of the route more than the vehicle itself.
Story Zoom
Starts closer and opens out along the route so the journey “reveals” for storytelling edits.
面板 06 · Map style
Globe & map style
Style controls how the 3D globe and basemap look in preview and in Instant recordings.
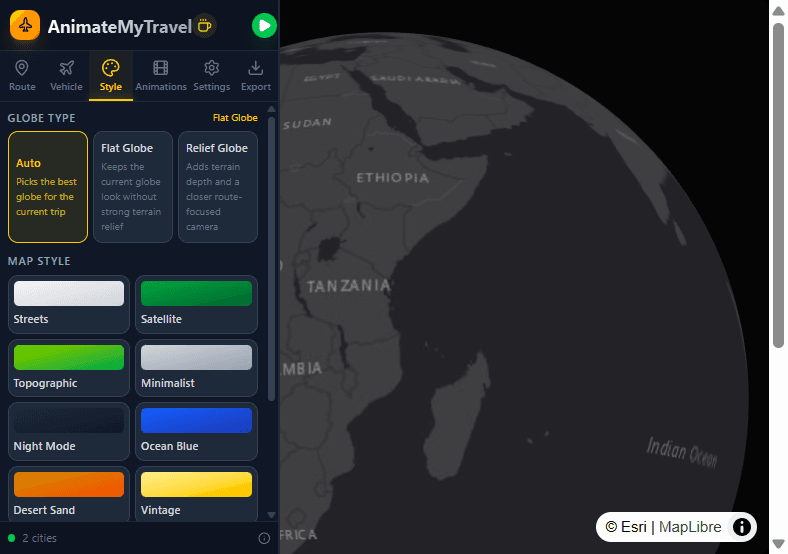
Globe Type picks Auto, Flat Globe, or Relief Globe (relief adds terrain depth and tends to use a closer route-focused camera). Map Style swaps the basemap among ten looks (Streets through Light Gray). Detail Level (LOD) biases map complexity up or down for your machine.
Style tab with globe type and map style options
每个控件的作用
Globe type
Auto chooses what fits the trip. Flat Globe keeps a smoother globe without strong terrain. Relief Globe emphasizes elevation and can feel more cinematic on long routes.
Map style
Pick Streets, Satellite, Topographic, Minimalist, Night Mode, Ocean Blue, Desert Sand, Vintage, Dark Gray, or Light Gray. Dark Gray/Night Mode usually match social intros; Satellite reads clearly for geography explainers.
Detail level (LOD)
Raise LOD for sharper regional detail if your GPU handles it; lower it on weaker devices to keep Preview and Instant export smooth.
面板 07 · Playback
Playback settings
Settings finish timing and on-map annotations before you export.
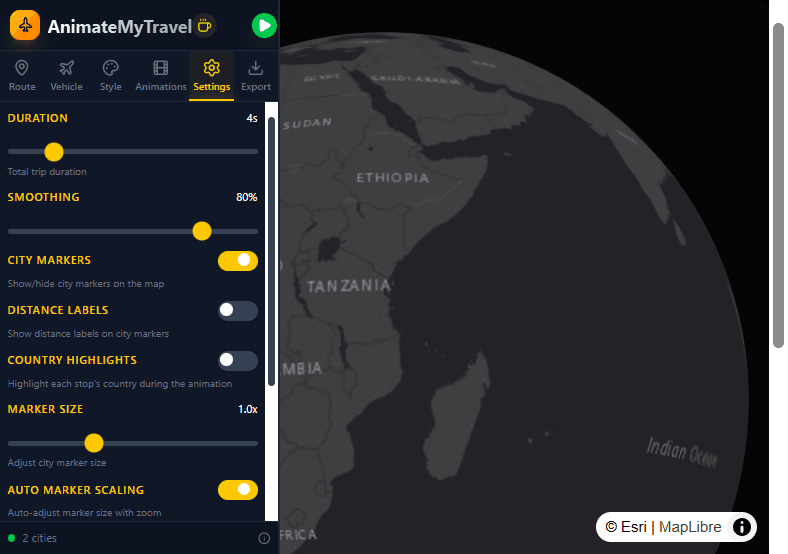
Duration runs from 1–20 seconds (YouTube presets often snap to 3s). Smoothing softens camera motion. City Markers, Distance Labels, and Country highlights toggle readability. Trail show/hide, color, and width draw the path behind the vehicle. Duration and vehicle size also appear on Route for faster edits.
Settings tab with duration, markers, labels, and trail
每个控件的作用
Duration & smoothing
Set how long the whole trip plays, then use Smoothing so pans do not feel snappy. Short social clips usually sit near 3–6 seconds; longer explainer maps can run toward the upper end.
Markers, labels, countries
Toggle city markers, scale them, and optionally let markers auto-scale with zoom. Distance labels sit on markers when enabled. Country highlights light each stop’s country during the animation when that option is on.
Trail
Enable the route trail, then pick color and width so the path stays visible against your map style (thin trails for Distant; thicker for Night Mode contrast).
面板 08 · Export
Export video
Export records Instant video in your browser at a fixed 1920×1080 resolution.
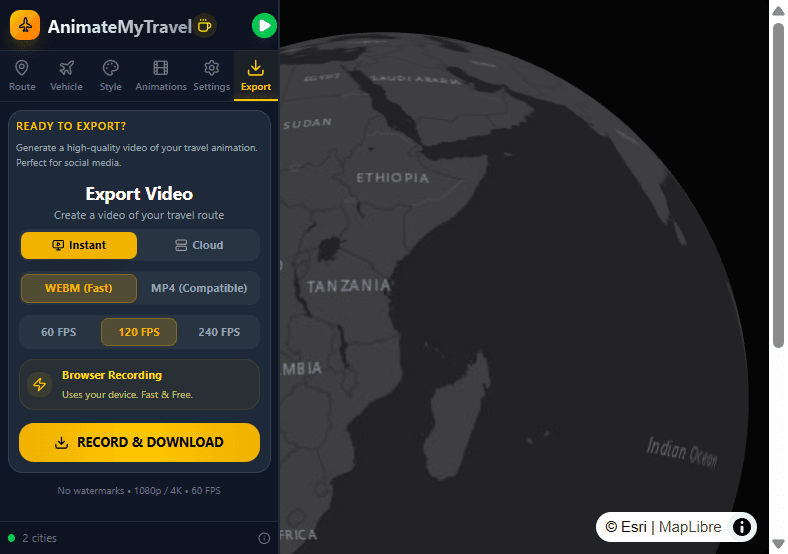
Open Export when the route is ready (usually two cities; one city is enough for Spin). Choose Instant (Free)—Cloud may be listed but is temporarily disabled. Format is WEBM (fast) or MP4 (compatible). FPS options are 60, 120, and 240. There is no in-app 9:16 selector yet: crop landscape exports in your editor for Reels or TikTok.
Export tab with Instant WEBM/MP4 and FPS options
每个控件的作用
Instant (Free)
Browser recording on your device. No signup, no watermark on Instant. Press Record & Download and wait for the file to finish encoding locally.
WEBM or MP4
WEBM usually finishes sooner. MP4 is the safer hand-off to CapCut, Premiere, YouTube, or Instagram uploads when editors complain about WEBM.
FPS
60 FPS is enough for most travel intros. 120 and 240 capture smoother motion if your machine can keep up during recording.
Cloud (disabled)
Ignore Cloud for now. If it is selected, switch back to Instant before recording or you will hit a temporary “cloud disabled” error.
面板 09 · Pitfalls
Common mistakes
Most failed previews or exports come from preset rules or expecting features Instant does not offer yet.
Disabled preset buttons are a signal, not a bug: Spin needs one city, Travel/Distant need two, Stops need three+, Distant also needs a long flying pair. The globe never adds cities by click. Vertical social formats need an external crop because Instant only records landscape 1080p.
每个控件的作用
Respect preset rules
If Travel, Spin, Stops, or Distant are greyed out, check city count, travel mode, and distance. Forcing a mismatched preset after a partial share URL can also surprise you—reset with Manual and rebuild.
No click-to-add on the map
Clicking countries or ocean does nothing for the itinerary. Always use Search city… or Add Random City, then wait for the list and “N cities” footer to update.
Vertical crops happen outside the app
Export MP4 or WEBM at 1080p landscape, then crop or letterbox in CapCut, Premiere, or your phone editor for Reels, Shorts, and TikTok.