アイデアからビデオへ
標準的なInstantエクスポートのためにアカウントは必要ありません。エディターはルートタブで開き、有効なルートを持つと、プレビューとエクスポートが利用可能になります。
ワークフローは4つのブロックと考えてください: 行程を構築し、各区間がどのように移動するかを選択し(およびオプションでYouTubeカメラプリセット)、ビークル/スタイル/設定でビジュアルを整理し、その後InstantのWEBMまたはMP4を記録します。CloudエクスポートはUIに表示されるかもしれませんが、現在は一時的に無効になっています—今日はダウンロードにはInstantを常に使用してください。
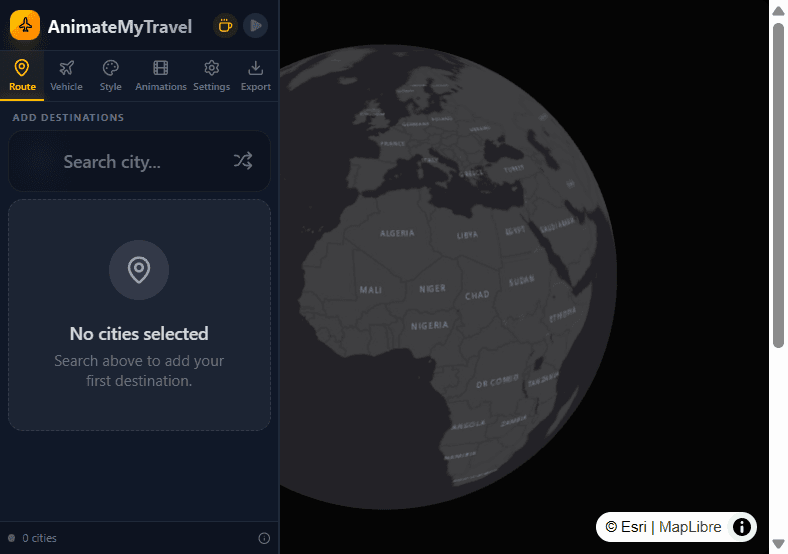 AnimateMyTravelエディター内のルートタブと都市検索
各コントロールが何をするか
「作成」を開いて都市を追加
「作成」に移動します。各停車地に「都市を検索...」を使用するか、「ランダムシティを追加」を使用してツールをすぐに試します。行程リスト内のアイテムをドラッグして並び替えます。都市はグローブをクリックして追加されません—マップはプレビューであり、場所ピッカーではありません。
移動モード(およびオプションのプリセット)を設定
2つ以上の都市がある場合、各区間はフライ、ドライブ、ウォーク、またはサイクルを表示します。この選択はルーティングと、ビークルがAutoのときのデフォルトビークルを駆動します。行程の上でYouTubeプリセット(Travel、Spin、Stops、Distant)を選択するか、マニュアルのままにすることができます。
ビークル、スタイル、アニメーション、設定を調整
オプションですが便利: Airplane/Car/Personを選択するか、Autoのままにしておき、グローブ/マップスタイルを変更し、YouTubeプリセットがアクティブでない場合はマニュアルカメラスタイルを選択し、期間、マーカー、トレイルを調整します。デフォルト値でも既に見られるクリップが得られます。
Instantビデオをエクスポート
書き出し → インスタントを開きます。WEBM(高速)かMP4(互換)、16:9か9:16、60 / 120 / 240 FPSを選びます。「録画してダウンロード」でブラウザ内にファイルができます。多くの流れでは都市が2つ以上必要で、Spinは1つで動きます。
ルートと目的地
ルートタブはすべてのアニメーションが始まる場所です。検索ボックスが空で都市が表示されない場合、「作成」の他の機能は何もプレビューやエクスポートができません。
検索(またはランダムシティを追加)を通じてのみ目的地を追加します。2つ以上の都市がある場合、行程は各停車地と編集/削除アクション、および都市間のコネクター上の移動モード制御をリストします。並び替えはドラッグアンドドロップです。地上モード(ドライブ/ウォーク/サイクル)は利用可能な場合は道路スタイルのルーティングを使用; フライは飛行機に適した大円スタイルのパスを使用します。
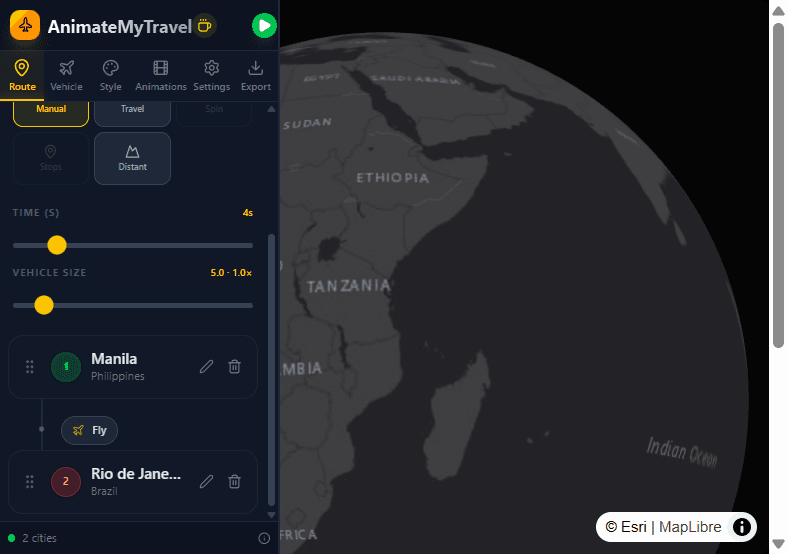 各区間の移動モード(フライ、ドライブ、ウォーク、サイクル)を持つ行程リスト
各コントロールが何をするか
都市を検索
都市または場所の名前を「都市を検索...」に入力し、リストから結果を選択します。「ランダムシティを追加」は、入力せずに探索したい場合は、キュレーションされたよく知られた都市を挿入します。フッターが少なくとも2つの都市を表示するまで追加を続けます(Spinで1つを使用する予定がない限り)。
区間ごとの移動モード
停車地AからBの間で、フライ、ドライブ、ウォーク、またはサイクルを選択します。モードを変更するとパスの構築方法とAutoビークルが表示する内容が更新されます。マルチシティトリップでモードを混ぜることができます(例: フライしてからドライブ)。
並び替え、編集、削除
都市をドラッグして訪問順序を変更します。「編集」を使用して検索経由で都市を置き換えるか、「削除」を使用して停車地をドロップします。変更後、パスがまだ更新中の場合はプレビュー前にルートの前処理を待ちます。
ビークルパネル
ビークルタブはルートに沿って移動するものと、グローブ上でどの程度大きく表示されるかを制御します。
Autoはデフォルト: フライ→飛行機、ドライブ→自動車、サイクル→自転車ビジュアル、ウォーク→人物にマッピングします。Airplane、Car、またはPersonを手動で選択することは、区間上の一致する移動モードも強制します。サイズは連続スライダー(約0–50)であるため、長距離飛行ショットはより小さな飛行機を使用でき、都市間ホップはより大きなものを使用できます。
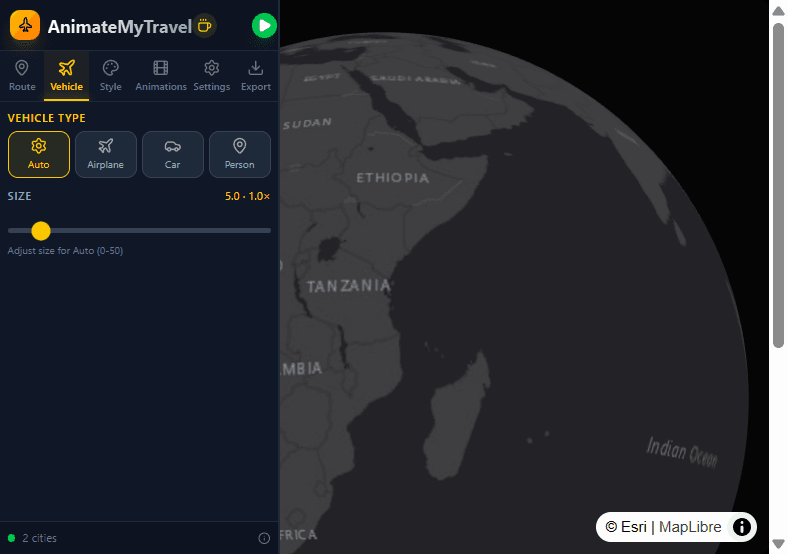 Auto、Airplane、Car、Personを表示するビークルタブ
各コントロールが何をするか
Auto
最良の開始点です。ビークルは各区間の移動モードと共に切り替わるため、マルチモード行程はこのタブを再度開く必要なく一貫性を保ちます。
飛行機
ビークルを飛行機にロックし、飛行区間を強制します。以前ドライブを設定していても、古典的なA→B飛行イントロに使用します。
Car
車へのロックとドライブ区間。道路ルーティングが信頼できるように見える短い大陸間のホップを好みます。
人物
歩行者図へのロックと歩行区間。短い都市部分に最適; 長い国間のホップは通常奇妙に見えます。
サイズ
サイズをドラッグしてプレビューでモデルをスケール化します。ルートタブはまたビークルサイズを公開して、行程を離れず高速調整ができます。
YouTubeアニメーションプリセット
YouTubeプリセットはルートタブ上の行程の上に置かれています。それぞれはカメラモーション、トレイル、着地を一般的な旅行ビデオの外観にパッケージ化します。
プリセットには都市数(および時々距離/モード)の厳格なルールがあります。無効化されたボタンは現在のルートと一致しません。プリセットを有効化すると多くの場合期間が3秒にデフォルト設定されます。マニュアルはYouTubeプリセットをクリアするため、「アニメーション」→「カメラスタイル」は自由に変更できます。古いシェアリンクからのレガシープリセットIDは依然としてこれら4つのアクティブなオプションにマップします。
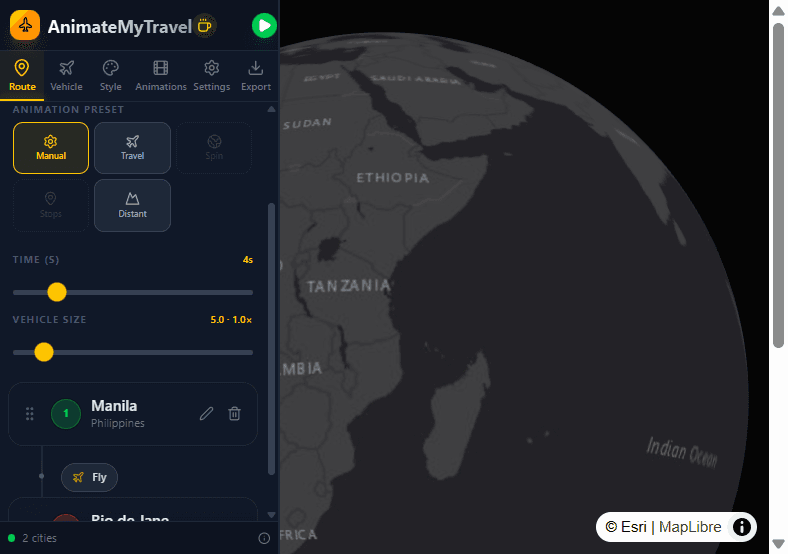 ルートタブ上のYouTubeアニメーションプリセットセレクター
各コントロールが何をするか
YouTube Travel
正確に2つの都市が必要です。映画のようなサイドトラックでビークルをフォローし、終わり近くに目的地に接近します—古典的なA→B飛行またはロード開放。
Globe Spin Arrival
正確に1つの都市が必要です。グローブをスピンしてその場所に到着します。目的地のハイライトのみがあるため、ルートトレイルはありません。
Country Stops
3つ以上の都市が必要です。より広いドローン風フレーミングと複数区間パスに沿った着地で経由地点の国を強調します。
Distant
2つの都市、飛行のみ、長距離(約1500 km以上)が必要です。広い引き戻し終了による飛行機の遠隔フォロー—大陸間ホップに理想的。
Manual
YouTubeプリセットをオフにします。「アニメーション」タブからSide Vlog、Drone Wide、Orbit、Overview、またはStory Zoomが必要な場合に使用します。
マニュアルカメラスタイル
マニュアルカメラスタイルはYouTubeプリセットがアクティブでない場合のみ表示および適用されます。
「アニメーション」を開き、「カメラスタイル」を選択します。これらのプロファイルは視点がビークルまたはルートをトラッキングする方法を変更します: サイド後進、遠いドローン、オービット、トップダウンオーバービュー、またはパスを開くズーム。「現在のカメラ」は同じタブにいる間、プレビュー中にライブトラッキング、ズーム、ピッチ、方位を表示します。
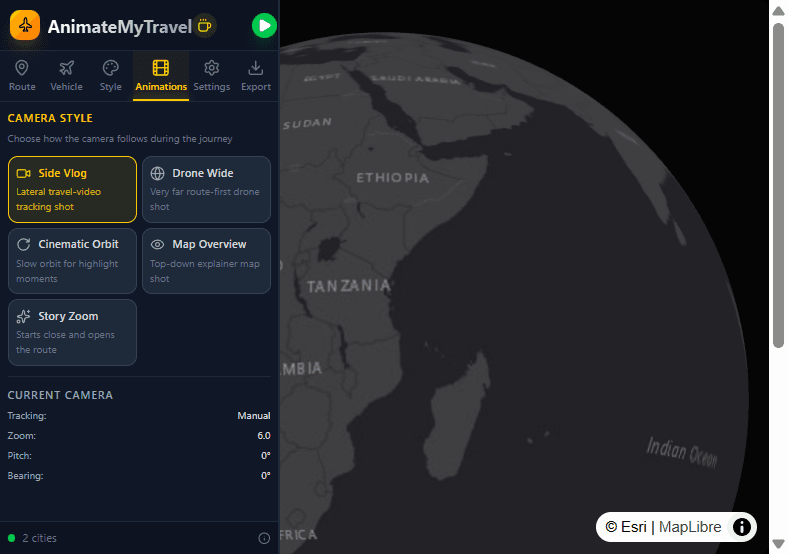 マニュアルカメラスタイルを持つアニメーションタブ
各コントロールが何をするか
Side Vlog
サイドトラッキング旅行動画ショット—パスに沿ってビークルの横を飛ぶカメラのような感じ。
Drone Wide
ルート全体を最初に読みやすく、その後より広いコンテキストでフォローする非常に遠いフレーミング。
Cinematic Orbit
到着またはハイライト時点に有用なスローオービット、目的地が提示されるのを感じたい場合。
Map Overview
トップダウン説明スタイル—ストーリーがビークル自体より多くルートの形である場合に適切。
Story Zoom
より近くで開始し、ルートに沿って開くため、ジャーニーがストーリーテリング編集のために「明かされる」。
グローブとマップスタイル
スタイルは3DグローブとベースマップがプレビューおよびInstant記録でどのように見えるかを制御します。
グローブタイプは自動、フラットグローブ、またはリリーフグローブを選択します(リリーフは地形の深さを追加し、ルート中心のカメラを使用する傾向があります)。マップスタイルはベースマップを10の外観間(StreetsからLight Grayまで)でスワップします。詳細度(LOD)はマップの複雑さを機械用に上下にバイアスします。
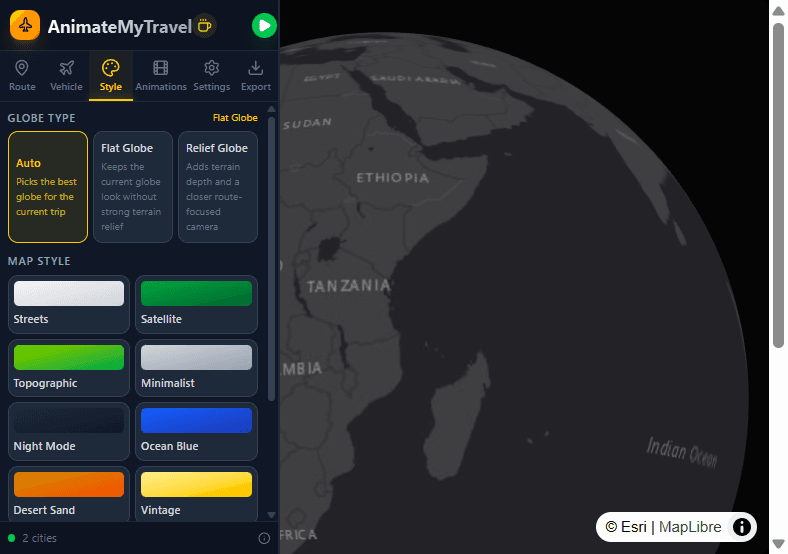 グローブタイプとマップスタイルオプションを持つスタイルタブ
各コントロールが何をするか
グローブタイプ
Autoは旅行に適したものを選択します。フラットグローブは強い地形のない滑らかなグローブを保持します。リリーフグローブは標高を強調し、長いルートではより映画的に感じることができます。
マップスタイル
Streets、Satellite、Topographic、Minimalist、Night Mode、Ocean Blue、Desert Sand、Vintage、Dark Gray、またはLight Grayから選択します。Dark Gray/Night Modeは通常ソーシャルイントロと一致; 衛星は地理的説明について明確に読み取れます。
詳細度(LOD)
GPUが処理できる場合、LODを上げてより細かい地域の詳細について; より弱いデバイスでは下げてプレビューおよびInstantエクスポートを滑らかに保つ。
再生設定
設定はエクスポート前にタイミングおよびマップ上の注釈を完成させます。
期間は1–20秒で実行されます(YouTubeプリセットは多くの場合3秒にスナップします)。スムージングはカメラモーションを柔らかくします。都市マーカー、距離ラベル、および国のハイライトはトグル読みやすさ。トレイル表示/非表示、色、幅はビークルの背後にパスを描画します。期間およびビークルサイズもルートに表示される高速編集用。
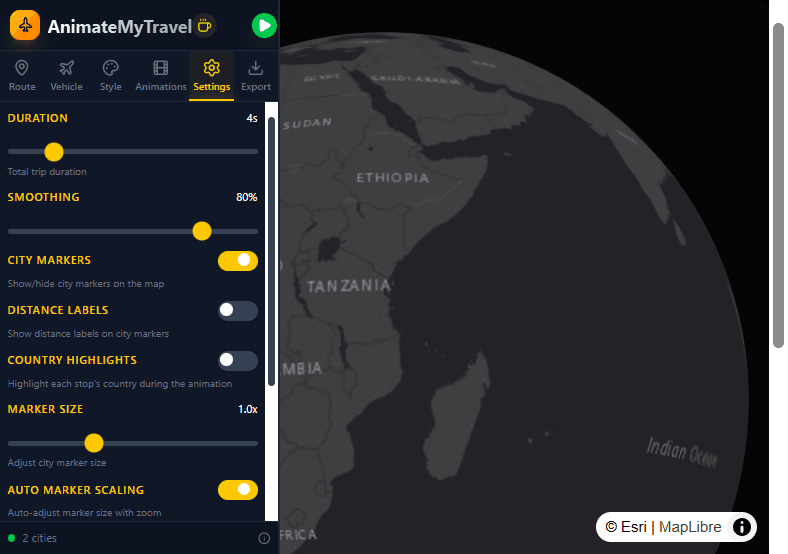 期間、マーカー、ラベル、トレイルを持つ設定タブ
各コントロールが何をするか
期間とスムージング
旅全体の再生期間を設定し、その後スムージングを使用してパンが急に感じられないようにします。短いソーシャルクリップは通常3–6秒の近くに座る; より長い説明マップはより上位の端に向かって実行できます。
マーカー、ラベル、国
都市マーカーをトグルし、スケール化し、オプションでマーカーがズームで自動スケール化されるようにします。距離ラベルは有効にされるとマーカーの上に座ります。国のハイライトは、そのオプションが有効にされると、アニメーション中に各停車地の国を照らします。
トレイル
ルートトレイルを有効にし、その後色と幅を選択してパスがマップスタイルに対して見ることができたままにします(Distantの場合は細いトレイル; Night Modeコントラストの場合はより厚い)。
ビデオをエクスポート
エクスポートではブラウザでInstantビデオを記録します。16:9(1920×1080)または9:16(1080×1920)を選択します。垂直は同じアニメーションを保持し、フレームの中心をトリミングします。
ルートが準備できたらエクスポートを開きます(通常2つの都市; 1つはSpinで十分です)。「インスタント(無料)」を選択します—Cloudは表示されるかもしれませんが、現在は一時的にオフです。速度用WEBMまたは互換性用MP4、16:9または9:16、60、120、または240 FPSを選択します。
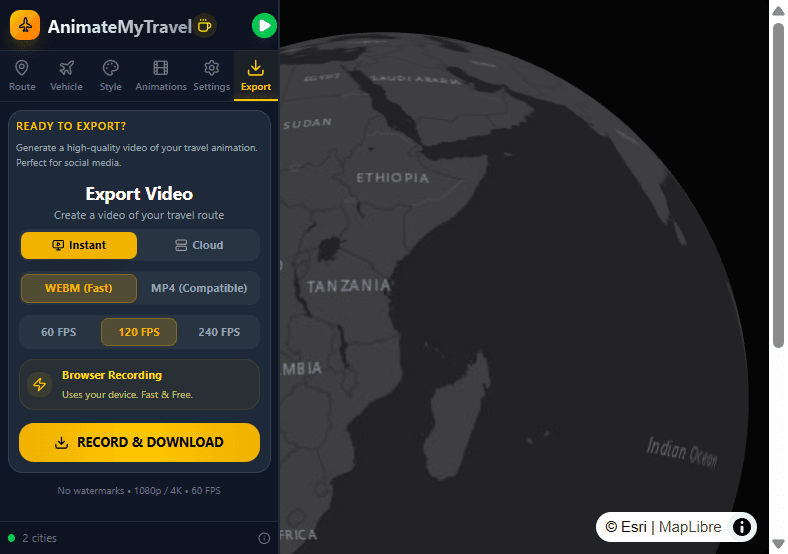 Instant の WEBM/MP4・画面比率・FPS がある書き出しタブ
各コントロールが何をするか
Instant(無料)
デバイス上のブラウザ記録。登録なし、Instantに透かしなし。「記録してダウンロード」を押し、ファイルがローカルで エンコーディング完了するまで待ちます。
16:9または9:16
YouTubeの場合は16:9を使用し、Reels、Shorts、TikTokの場合は9:16を使用します。垂直はカメラを再フレームしません: 1080×1920に同じアニメーションの中心をトリミングします。
WEBMまたはMP4
WEBMは通常より早く完了します。MP4はCapCut、Premiere、YouTubeまたはInstagramアップロードへのより安全なハンドオフです(エディターがWEBMについて不平を言う場合)。
FPS
60 FPSはほとんどの旅行イントロに十分です。120および240は記録中にマシンが対応できる場合、より滑らかなモーションをキャプチャします。
Cloud(無効)
今はCloudを無視してください。選択される場合、記録前にInstantに戻してください。そうしないと一時的な「cloud disabled」エラーが発生します。
一般的な間違い
ほとんどの失敗したプレビューまたはエクスポートはプリセットルールまたはInstantがまだ提供しないと予想される機能から来ています。
灰色のプリセットはルールであり、バグではありません: Spinは1つの都市が必要、TravelおよびDistantは2つが必要、Stopsは3つ以上が必要、そしてDistantはまた長い飛行が必要です。グローブをクリックすることは決して都市を追加しません。垂直ソーシャルビデオの場合、エクスポートで9:16を選択してください—Instantは同じアニメーションを1080×1920にトリミングします。
各コントロールが何をするか
プリセットルールを尊重
Travel、Spin、Stops、またはDistantが灰色の場合、都市数、移動モード、距離を確認してください。部分的なシェアURLの後のミスマッチプリセットを強制することはあなたを驚かせることもできます—マニュアルでリセットして再構築します。
マップ上にはクリック追加がない
国または海をクリックすることは行程に何もしません。常に「都市を検索...」またはランダムシティを追加を使用し、その後リストと「N都市」フッターが更新されるまで待ちます。
垂直ビデオに9:16を選択
エクスポートで、Reels、Shorts、TikTokの場合は9:16(1080×1920)を選択し、YouTubeの場合は16:9を選択します。アニメーションは同じです; 側のみトリミングされます。